O’Dowd’s Orchids Blog and Care Instructions
O'Dowd's Orchids Premium Store Blog is a vibrant destination where orchid enthusiasts can deepen their love for these extraordinary plants. Our blog features a wealth of information, from expert tips on caring for Cattleya, Coelogyne, and Cymbidium orchids to insightful articles about the latest trends in orchid gardening. We share stories about the unique personalities of our orchids, fostering a connection between our plants and our readers. Whether you’re a seasoned grower or a curious newcomer, our blog aims to cultivate a community that celebrates the beauty and diversity of orchids while providing practical advice to enhance your orchid-growing journey. Embrace the artistry of orchids with us and discover how to make them a cherished part of your home.Our blog posts are done once per month to help and inform our customers. We hope you enjoy.
Slip Potting
Written By ODowds Orchids
Slip potting is an easy way to move orchids to a larger pot without disturbing the roots. This is best not to do when they are blooming. This is more for orchids that have completely outgrown their pot and are soon to bloom.
Loosen the media, pull the orchid out gently from the bottom of their stems, add an inch or two of media at the bottom before the plant goes in, don’t disturb the roots or the old media and fill in the empty spots around the roots with new media.
This will allow your overgrown orchid to have more room, go on to bloom, and you can change the media after the bloom, if need be.
Slip potting has worked for me, even when they are in bloom but you have to be so careful that I would not advise it. You could lose all your blooms. I often have Cymbidiums that are growing out of the top of the pot because the roots are too crowded. So, I slip pot them and I do it quickly and gently. I try not to disturb them. They barely know it happened.
Just remember, when slip potting, you will be tempted to cut off dead roots, or pull off old media, don’t do it, unless you want to skip the blooming. Sometimes, it is necessary to use this method simply because the roots are growing out of the pot at the top and bottom. The pot barely holds media anymore because the roots have taken over. Just slip pot and put them back into their favorite spot and leave them alone.
Enjoy your orchid adventures!
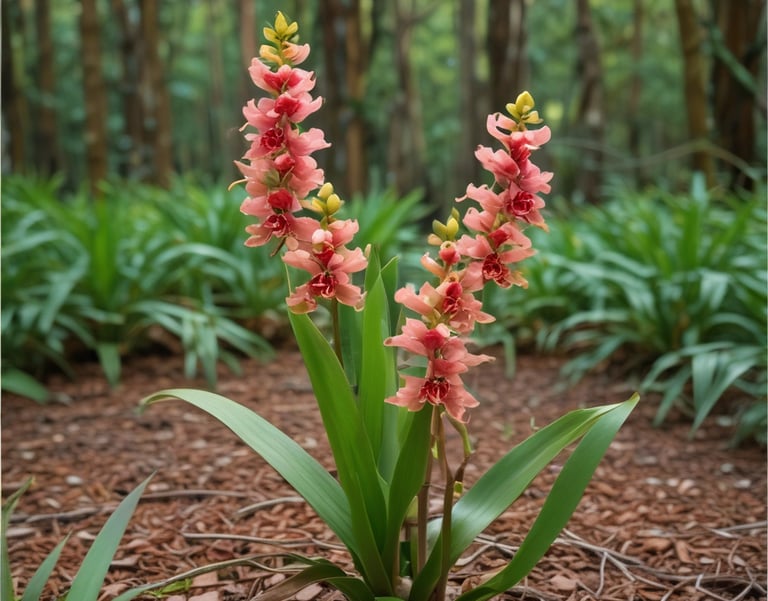
Coelogyne Orchids
Written By ODowds Orchids
Coelogyne orchids are my favorite orchids. They have small delicate blooms, are almost always fragrant, and can grow quickly and become very large if you allow them.
I use both moss and small media in my pots for Coelogyne orchids. I put moss around the roots and fill the pot with small media that has rockwool mixed in for keeping the media moist.
Coelogyne orchids can be overwatered just like all other orchids. So, if you see the pseudo bulbs turning yellow, check to make sure it is not too wet. If so, remove it from the pot and let it sit in a larger pot for several days until it drys out a bit. Coelogyne orchids are fairly easy to work with but like all orchids, too much heat, too much cold, or too much water can kill them quickly.
We have some very large Coelogyne orchids in our shop. Check them out and enjoy. Also, Coelogyne orchids love to hang in baskets. Enjoy!Slip Potting
Written By ODowds Orchids
Brown Pseudobulbs On Cymbidiums
Written By ODowds Orchids
Brown pseudobulbs can mean a variety of things but it is usually overwatering. They first have one or two of the cymbidium leave that will have a couple yellow leaves and start dropping them after each watering. The cymbidiums looked dry however, deep down inside, they were wet. When it is hot, they dry out more quickly. Each area of the U.S. has different heat, humidity, and fluctuations. If you overwater, put them in a larger pot and let them dry out a bit. Not totally dry but barely damp. Add large media but not a lot. Leave lots of air pockets and good air circulation where ever you set them.
If you repot with new media when the cymbidium is not in bloom, that will be fine. Just remember not to put into a much larger pot, or the cymbidium will work on more roots and not blooms. If your cymbidium is crowded in the old pot, give it about a 1/2 inch more around the pot. This will cause the roots to spread out a little and still bloom later in the year. Do not water until the roots are white and almost completely dry. Let the water drain out of the bottom and set the Cymbidium on a wire shelf to get air under the pot as well as on top. You may lose leaves but you will save the plant. Use see through pots if you need to. You can see when the roots are dry (white) and when they are wet (brown).
How to Fix Orchid Root Rot
Remove the Orchid From its Pot. ...
Remove Excess Planting Material. ...
Prune Damaged Roots. ...
Spray the Roots with Ginger water ...
Repot with large media and only a small amount. You want to dry out your Cymbidium.
Allow the Orchid to Recover, water when the roots are white and almost completely dry. DO NOT WATER CROWN OF THE PLANT, WATER AROUND THE CYMBIDIUM.
“Fertilize at the proper time to help Cymbidiums flower. Use a high nitrogen fertilizer such as (30-10-10) from March until May, a balanced fertilizer such as (20-10-20 / 10-10-10) from June until September, and a blossom booster such as Dyna Grow Bloom (3-12-6) once you see spikes forming in early spring.”
Cymbidiums need bright indirect light. If the leaves are a lovely dark green, they are not getting enough light. I have ‘grow lights’ but here in Idaho May-August we have our summers. Which is great if we don’t have a lot of clouds. Mine go out on the porch but the afternoon sun is too strong so I have to cover them with shades.
Written By ODowds Orchids
How To Make Cymbidiums Bloom
Written By ODowds Orchids
Cymbidiums love fresh cool air to bloom. If you grow them indoors you make sure they have enough light and cool temperatures. They can be moved outside from May-August (depending on climate change) and what part of the country you live in. You want it to get down to 50-55 degrees at night and up to the 70’s during the day. If Cymbidiums get too hot, they may not bloom. I keep my Cymbidiums in a cool, dry area on a porch during the summer and indoors during the winter. I live in North Idaho, so our winters do go down below freezing. During the summer I monitor the watering very closely because they get thirsty in the summer months and they dry faster outside. I water once per week in the summer. Many cymbidiums do not want that much water, so brown pseudobulbs means cut back on watering. Believe it or not, each cymbidium is different.
Light
Unless you’re in the northern states, no direct sun. Hang a shade cloth to hide them from direct sun. Dappled light is okay as long as it does not burn the leaves. Where I live, the summer sun can get very hot, and I shade the greenhouse in the afternoon. Southern states will have to protect them from direct sun and high heats. Perhaps a covered porch with some air blowing on them. They don’t like it over 70 degrees so you may have to grow indoors. Give them the maximum amount of light without burning them.
Artificial lights use them for 10-12 hours. They can’t get sunburned but they need lots of light to bloom. If your leaves are dark green, that means there is not enough light. They Cymbidium leaves should be a lighter green.
Water To Keep Damp But Not Soaked
Cymbidiums like to be damp but not soaked. So, you can water according to where you live and how dry or humid it is. When the Cymbidiums are outdoors for hot days, use a spray bottle and mist them with warm water. In some states you may have to water two times per week, like Arizona. In some states like Michigan you may only need to water once per week or per 10-12 days. Keep track of your moisture in the media.
If you live in the middle states, you will often see lots of foliage on the Cymbidiums but not blooms. It is all about cool temperatures and lots of light. This can be accomplished but it takes some tweaking to get it right. Don’t give up. They will bloom after you figure out how to keep them cool and in bright light.
Take care and have fun. When Cymbidiums bloom, they are glorious and last for many weeks and often several months. For the first bloom expect one or two branches to bloom. It increases every year. Don’t forget to feed them twice per month during the growing summer season.
I Often Hear, "I can't grow orchids."
Many people often say, "I can't grow orchids." This belief might stem from the perception that orchids are delicate or require specialized care, but the truth is that if you can manage to care for houseplants, you can absolutely grow orchids successfully. The key to nurturing orchids lies in understanding their basic needs, particularly when it comes to watering habits. One of the most common mistakes made in orchid care is overwatering. Unlike many houseplants that thrive with regular watering, orchids are particularly sensitive to excess moisture. If you purchase orchids from big box stores or grocery stores, they often come packed for lengthy travels, which unfortunately involves being placed in wet moss. This scenario is detrimental to the health of the orchid and can lead to its demise in just a few days. If you find yourself with an orchid that has been packaged in wet moss, it's essential to act quickly. You may notice that the blooms are wilting, which may be concerning, but losing the blooms is far less critical than losing the orchid itself. Start by carefully removing the orchid from its pot and gently detaching the moss. Allow the roots to dry out completely before repotting the orchid in dry media. When you do repot, be cautious with the amount of water you apply; less than half a cup should suffice to start. For those lucky enough to order orchids directly from reputable growers, it's crucial to ensure that the media isn’t too damp upon arrival. Gently slip the orchid out of its pot to assess the moisture level. During warmer months, I often find myself watering orchids just before they are due to be packed for shipping. This way, the plants arrive with just the right amount of moisture to keep them healthy without risking overwatering. With these precautions in mind and a little attention to detail, anyone can cultivate beautiful orchids in their home. Remember, it's about finding the right balance in their care. By being mindful of how much water your orchids receive and paying close attention to their needs, you can enjoy the stunning beauty of these remarkable plants without fear of failure.
HOW TO USE NON-CHEMICAL SOLUTIONS
How To Use Non-Chemical Solutions
Written By ODowds Orchids
Some people have allergies to chemicals, including herbicides and pesticides. I grow 200 orchids indoors in the winter. Many of these go out into the greenhouse in the summer. So, chemicals in my house is not okay. I use these products.
Dawn Dish soap, Peroxide, Cinnamon, Rubbing alcohol
Dawn dish soap:
With 1 tablespoon in a spray bottle, 8 ounces with warm water, sprayed on your orchid that has mealy bugs, will suffocate the mealy bugs. Some people add a little oil, like cooking oil. Do not spray on blooms if you can help it. Most mealy bugs are on the soft stems of new blooms. Do this once per week, for at least two weeks. I also take the bottle and pour the soapy water over the media and count it as that week’s watering. It kills all bugs in the media. Most orchids will go on to bloom. You recognize mealy bugs by some clear droplets on the new stems. They look like drops of water. But when you touch them they are sticky. Spray your orchid and separate the infected orchid from the other orchids. Mealy bugs can travel across a room, so keep watching for these clear droplets that look like water drops. Wash your hands thoroughly, or take off your gloves and get new gloves if you have touched a sick orchid. Keep in mind that mealy bugs can live in curtains, in brick walls, and a variety of surfaces, so spray them all.
Rubbing alcohol to clean tools.
If you have one moisture meter and you put it into several plants, spray off the probe and wipe clean with a paper towel after each plant. You can easily pass illness from one plant to another with your hands or tools.
When cutting back orchids, always clean between plants. Any tool you use with one plant, should be cleaned before you go on to another plant.
Peroxide mixed with water, ½ and ½.
Use this for white mold that is powdery on the leaves. It will fizz on the leaves and that is good. Use it once per week for three weeks and keep that plant and all plants with bugs or disease away from all your other orchids. I spray both the top and the bottom of the leaves. This also works on brown spots and other diseases. The brown spots will not go away but they will stop spreading. When mixing peroxide with water, only store for one week and throw out. The plastic in all bottles with peroxide, rubbing alcohol, and any strong natural product can deteriorate and make the solution toxic.
Diseases or bugs, cinnamon rubbed on the brown spots will help stop the spread. Cinnamon does deter bugs.
Cinnamon can deter bugs and will help stop the spread of brown spots. The brown spots often spread out meaning elongate or get larger on the leaf but they do not spread. Cinnamon spread lightly on the top layer of media can discourage bugs from reentering the plant. I normally remove the plant, clean off the roots, throw out the media, spray with the peroxide solution on the roots and replant in a clean pot with new media. The old media must be thrown out. The pot must be cleaned throughly. The sick orchid should not be near any other orchids for 1-2 months.Brown Pseudobulbs On Cymbidiums
Written By ODowds Orchids